- Apowersoft Screen Recorder Version
- Apowersoft Screen Recorder Pro Free
- Apowersoft Free Online Recorder
- Apowersoft Online Screen
- Apowersoft Screen Recorder Download Pc
Apowersoft Screen Recorder Activation Code Download Latest 2020. Apowersoft Screen Recorder Pro Patch is an easy-to-use and professional desktop tool to simultaneously record audio and screen activity. It also allows you to save videos as standard MP4 files. Apowersoft Free Online Screen Recorder is really easy to use, featuring a simple interface and on-screen tips to help get you started. Once you’ve downloaded the installer, simply click Start Recording. You'll see the recording toolbar and the center of your screen will be automatically selected as the recording area. Is Apowersoft safe to use. Its a screen share program for window. Im scared to get a virus. Apowersoft is use to make window able to do AirPlay for apple Some might classify programs like that as PUPs/PUAs = potentially unwanted programs/application. You might want to use VirusTotal or any other service from this List of Online Analyzers/Services.
I tried to use Apowersoft Screen Recorder record my PC screen, but failed, who can help?
If you fail to record screen with Apowersoft Screen Recorder, look through your firewall and create an exception for the API. The API is trusted and you should have no fear of malware being installed on your computer. The tool comes with advanced security features on the Apowersoft servers, so there is nothing to worry about. You may also check that you have great Internet connectivity at all times, so as to have uninterrupted recording sessions. Here are the steps that you need to follow to ensure that you work well with this advanced screen recording tool.
.jpg "Pro")
Part 1: How to Record Screen with Apowersoft Desktop Screen Recorder
Step 1) Download the software. Download the software first. Once it is installed, click on the 'Record' button to begin recording unlimited videos in your account.
Step 2) Customize your recording area. Using your mouse, drag to set the region that you want to record. Your recording will start as soon as you confirm the region. You can drag it to fit your screen for a full-screen recording. You can add a webcam overlay if you want to create instructional videos where your audience can see you.
Step 3) Edit your video in real-time. You can add annotations, call-outs, notes and other items in your video as you continue recording. This will add more interactivity and you audience will love watching your videos more.
Step 4) Stop recording and save your video. Click on the “Stop” button to end your recording session. You have the option of downloading the video and saving it to your local drive, or you can save it to the cloud. You can also send the video to your YouTube or Vimeo channels. Send to Google Drive, DropBox and many other online storage facilities.
Part 2: Apowersoft Screen Recorder Alternative - Aiseesoft Screen Recorder
Aiseesoft Screen Recorder can also be used to record your screen in the same manner as Apowersoft. The only disadvantage is that you cannot encode or edit your video using Aiseesoft. The video is created in the Windows .WMV format and you will have to use another video editing tool to edit your videos. However, one cannot downplay the features that Aiseesoft offers, and these may be worth the effort, when you see how great your finished product will be.
- Create custom region recording areas – Whether you want to record your full screen or just a small region, Aiseesoft’s flexibility lets you author your video according to your needs.
- Clean video recording – With the ability to output high resolution 1080p video, you can create fantastic, clean videos for your audience.
- Recording from several sources Whether you are recording streaming video from your favorite online movie site, or recording your webcam, Aiseesoft does a lot more than just record your screen. Adding webcam overlays is easy when using this tool.
- Record audio from your microphone and system – This versatile tool allows you to use either the system audio or the microphone to record audio over your video. As an added feature, you can also use both, such as when you are recording a video chat on Skype, or teaching people how to play a game, and you need to add your narration over the game’s sound effects.
Step-by-step guide to record screen using Apowersoft Screen Recorder Alternative
Step 1) Install and launch Aiseesoft
Get the installer here and then install the recorder. When the installation is complete, it will, automatically launch your recording interface.
Step 2) Select the recording region
Decide whether you want a full screen recording or you want to define a certain area. Use the mouse to create your recording zone.
Step 3) Make your audio settings
Depending on the type of video you want to create, decide whether it would be best to use the system audio or microphone. You may also use both as mentioned earlier. The purpose of the video is paramount in determining what mode of audio recording you will use.

Step 4) Record your Screencast
Once you are satisfied with your video region and the audio settings, hit the “Record” button to start your recording.
Click on the “Stop” button when you are done with your session. Aiseesoft does not encode the video and will only output the video in Windows .WMV format. The raw footage that you have just saved may be too large to send over the Internet. Get a good converter to save your video as .MP4 and then upload to your favorite video channel or your personal website.
Apowersoft screen recorder is a professional web-based tool to record video and audio content simultaneously. You can perform various activities with the use of this software. You can choose the type of audio input, capture screenshots, annotate, etc.
Moreover, the application can save the recorded videos in the common MP4 files. Furthermore, utilizing its inbuilt converter, you will be able to convert and save those MP4 files into .avi, .flc, .swf, and other formats without losing quality.
With Apowersoft’s advanced and entirely intuitive interface, you are provided with the flexibility, which empowers users to enhance the screencast experience. With this Apowersoft free screen recorder review, I will help and try enlightening you on how to download and get started with this Apowersoft free online screen recorder.
I will further cover the pros and cons, key functionalities, and more. Also, with this Apowersoft Screen Recorder Pro review will help you decide how suitable this software is for you.
Download Apowersoft free screen recorder and Get Started
Here’s how you can download Apowersoft Screen Recorder Pro in Windows:
Step 1: Launch your preferred browser and visit the download page of Apowersoft Screen Recorder Pro
Step 2: The page will show two options: ‘Download’ and ‘Buy 1 Get 1 Free’. Click on the ‘Download’ button, and the download will begin.
Step 3: Open on the .exe file from your browser or find the location of the download in File Explorer and open the file from there.
Step 4: Windows will ask you for permission to let the application make changes in your pc. Once you choose ‘Yes’, Apowersoft will ask you to select the language you prefer.
Step 5: Once you’ve chosen the language, the Apowersoft installer will initiate; click on ‘Next’ to start the installation process. Agree to the license terms and conditions to continue.
Step 6: Once you’ve agreed to the license terms, the installer will ask you to choose a folder to save the program files. You can select the folder location by clicking on ‘Browse’.
Step 7: After deciding upon the location, click on ‘Next’.
Step 8: Keep clicking ‘Next’ while making sure that your preferences are reflected in the options given by the installation wizard.
Step 9: The installation will be completed in moments with your Apowersoft Screen Recorder Pro ready to go.
To get Apowersoft Screen Recorder Pro in Mac, visit https://www.apowersoft.com/mac-os-screen-recorder or click here. Follow similar steps with the .pkg file instead of the .exe file.

How to get Apowersoft Screen Recorder Pro Activation Code for free?
Generally, Apowersoft Screen Recorder is priced at $39.95 per serial key; however, Apowersoft is allowing you to get the full version of the screen recorder without spending any money. You can enjoy the Pro benefits for free if you participate in the official giveaway offer. You have to complete the following steps to get the Apowersoft Screen Recorder Pro activation code for free.
.jpg "Apowersoft Online Screen Recorder Download")
- Firstly, visit the giveaway page at https://www.apowersoft.com/promotion
- Scroll down to find the ‘Daily Software Giveaway’.
- Share the offer via any social media platform that you prefer.
- Once you’ve shared the offer, enter your details to receive the Apowersoft Screen Recorder Pro activation code for free. The code will be sent to you via email.
- Launch Apowersoft Screen Recorder and log in or sign up with a new account.
- Click again on the account icon, and a message will be displayed that will give you the option to upgrade to VIP or activate VIP. Click on the activate VIP option.
- A new box will be shown where you have to enter the code sent to your email.
- Once you activate the software, you will be privy to all the Pro features for free.
Interface and Key Features
Apowersoft Screen Recording Pro has one of the most accessible interfaces in the market. You can add lines, text, annotate, edit the screencast in real-time. The listing of video files makes locating, editing, sharing, uploading, removing, and playing of video files incredibly easy and accessible.
Starting with the default options, play out very well, so if you are a beginner, then you can try out the default settings first to get yourself used to all the options available to you.
Key Features of Apowersoft online screen recorder
- Multiple Recording Modes: You can choose to record the full screen, any portion of the screen, tracking your mouse to record, or even a particular window that you select.
- Unlimited Recording Time: Record for as long as you want.
- Record Screen with Audio Simultaneously: Makes gameplays and walkthroughs smooth with audio in sync with the video.
- Record via Webcam: Lets you record screen through Skype, MSN, and GTalk.
- Edit in Real Time: Edit your videos in real-time.
- Scheduled Tasks: The program lets you schedule tasks by allowing you to choose the start time and the customized duration that means you can record your screen without staying in front of the computer.
- Save Screencasts and Share: You can record your screencasts, edit them, and share them with your favorite platforms all from within the application.
How to Use it to Record Screen – Step by Step Guide to Set up and Record
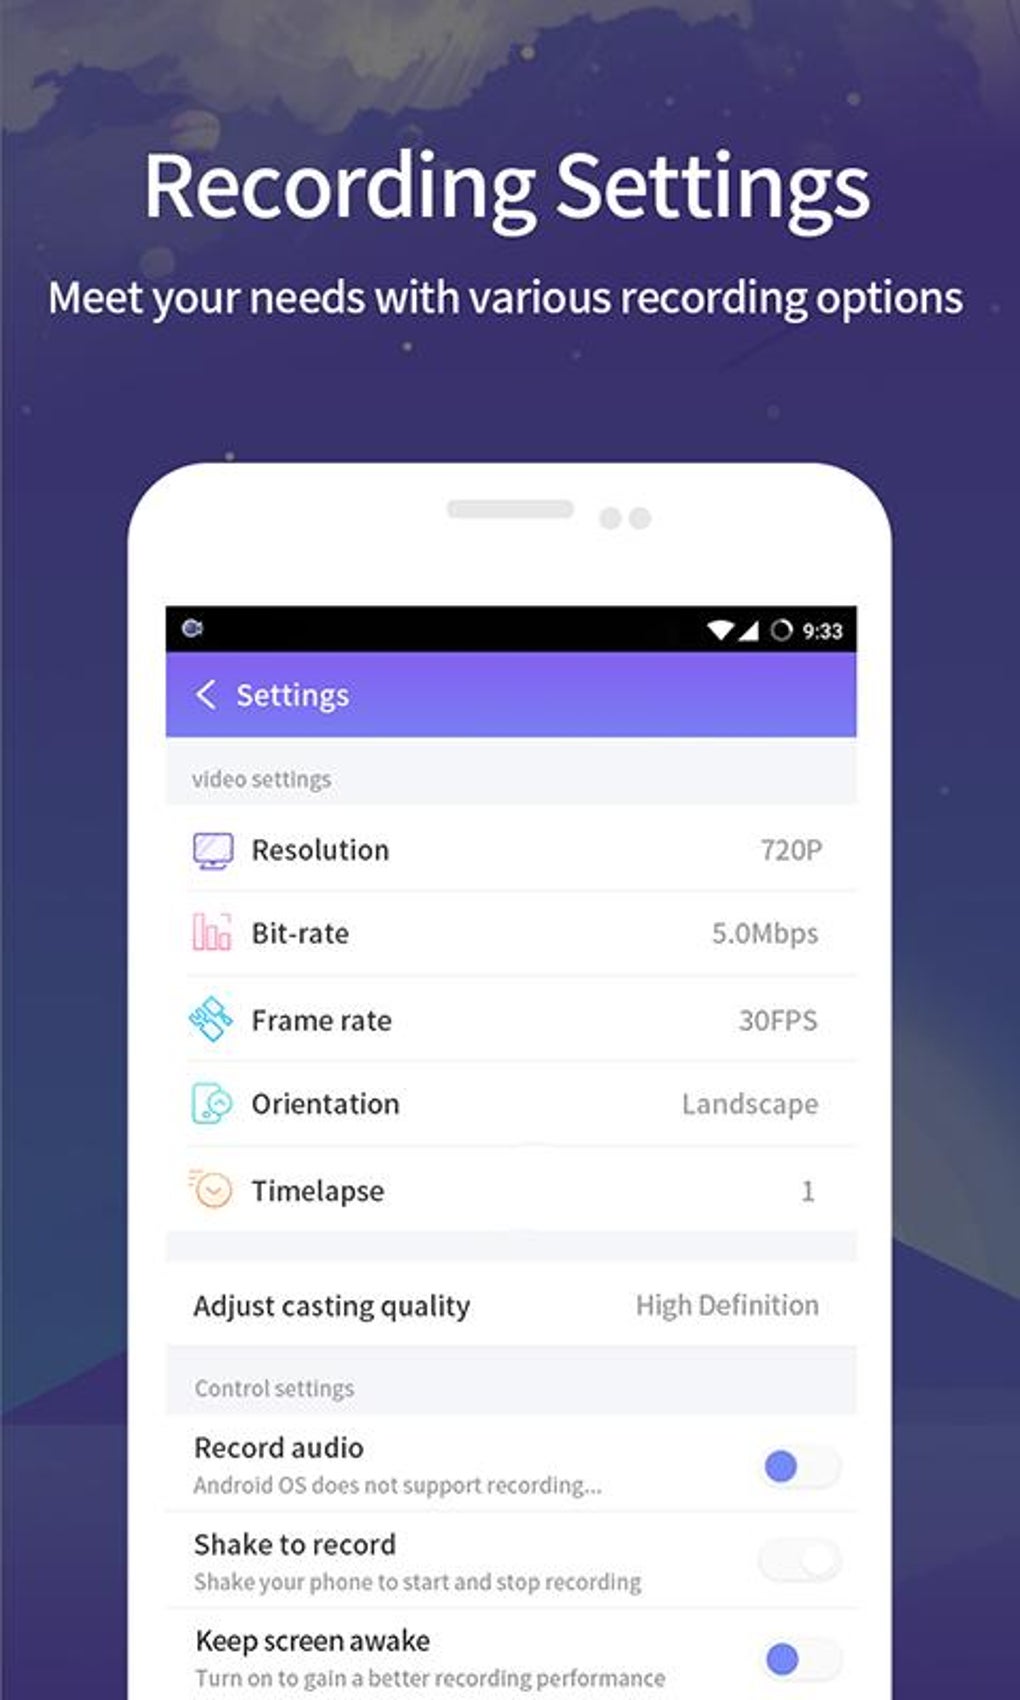
1. Configure Settings: Before recording, choose your preferences, and configure the settings as you wish like audio input. You can also configure advanced settings before you start recording; there are presets ready for you to enable the screencasting elements.
2. Select Your Audio Input: You can choose between ‘System sound’, ‘Microphone’, ‘System sound and Microphone’. Choose the one most suitable according to your requirements.
3. Multiple advanced settings can also meet your other needs: Select ‘Settings’ and ‘Options’. The popup box will give you a course of action that will help you produce high-quality screencasts.
4. Set up your Output Directory and Hotkeys: You can control the recording with hotkeys (keyboard shortcuts) from ‘General’ settings. Apowersoft Screen Recorder Pro provides shortcuts that let you start recording, shows you a countdown before recording, shows recording toolbar to make screencasting easier.
Apowersoft Screen Recorder Version
5. Mouser Cursor Record: For those who make instructional videos, this option will be beneficial. The application lets you record screen with the movement of the mouse cursor; you can check the ‘Include cursor in capture’ box and click on Mouse Style Settings from ‘Advanced’ in Options setting; you can customize the animation color, hotspot color, and size.
6. Choose the format of the output video and customize bitrate, frame rate: The recording would be saved in the .wmv format by default; if you want to save recordings in other formats, then go to Recording in Options and click on the dropdown menu provided beside ‘Video format’. Under Recording, go to ‘Advanced video settings’ and select the bitrate, frame rate, and audio format.
7. Recording Mode: The application allows you to choose between Region, Full Screen, Around Mouse, Webcam, and Only Audio. Select the dropdown menu from ‘Start’ and select the mode you want.
8. Region Mode: In the Region mode, click and drag your cursor along the region you want to record and the release. You can customize the ratio of the region in the toolbar shown below; click on ‘OK’ to start recording.
9. Moving recording area while screencasting: You can move the screencasting region to any other part of your screen by going to Settings > Options> Recording> Advanced video settings. Check the ‘Allow moving the recording region while capturing’ box before recording; place your mouse at the four corners of your capturing region and successfully move it.
10. Annotate in Real Time: To access the editing options, just click on the pen icon directly; you can also pause and explore the editing options. If you wish to get a picture in picture recording, then click on the camera icon on the toolbar to relay the webcam feed to the recording.
11. Finish: To wrap up your recording, click on the red stop button; the video recorded will appear on the recording list and also be saved in your computer automatically. After a screencast is done, you can play it, rename, edit, delete or upload it.
Pros and Cons of Apowersoft Screen Recorder Pro
PROS | CONS |
Dynamic Screen Capturing Options | Lacks Efficient File Management Tools |
Full image editing | Cannot Capture on a Secondary Monitor |
Real-Time Editing | |
Easy User-friendly interface | |
Lightweight Application | |
Real-Time Screen Monitoring |
Best Apowersoft Screen Recorder Pro Alternative – Wondershare DemoCreator
For those who want to record high paced online gameplays, DemoCreator Screen Recording Software is the best alternative to Apowersoft Screen Recorder Pro. Some of the main features of DemoCreator include recording high paced games at up to one hundred and twenty frames per second, screencasting and webcam simultaneously. Apart from the basics, it also serves as a video editor tool, with which you can do basic editing, add texts, callouts, annotations, and more.
Apowersoft Screen Recorder Pro Free
DemoCreator also provides 4K resolution editing support, gif support, video stabilization support, keyframe editing, noise removal, seven different languages supports, and many other features that Apowersoft Screen Recorder Pro doesn’t. DemoCreator provides us with a fully featured video and audio editing suite.
Apowersoft Free Online Recorder
With its powerful features, the interface has been made easy for people of all ages and backgrounds to navigate around the application to make the best use of the options available. With the rise in online education, DemoCreator has made it easy for teachers all around the world to create a fully functioning online course material in video format. With the help of diverse users, DemoCreator has only gotten better, giving us more for less.
Apowersoft Online Screen
Conclusion
Apowersoft Screen Recorder Download Pc
Apowersoft Online Screen Recorder offers a wide array of options for free, which is very hard to find in other software in this range. Once you figure out your requirements, you will be able to choose accordingly. However, DemoCreator is also a great computer screen recorder that offers rich recording options to meet your needs better. Choose the software that suits your situation and have a try!